Iphone Firmware v1.0.2 Serial Port Tutorial By Collin Meyer (TheRain) 12-09-2007
PLEASE NOTE: It was recently brought to my attention by Morten that this trick is not necessary for Iphones with 1.1.1 and 1.1.2 firmwares.
DISCLAIMER: Interfacing electronically to the Iphone has the potential to cause severe damage to your Iphone or cause your Iphone to become non-functional. By following this tutorial you take sole responsibility and understand the risks of what you are doing.
source : http://devdot.wikispaces.com/Iphone+Serial+Port+Tutorial
Summary
This tutorial will explain how to use the serial RX and TX lines on the Iphone as a standard UART serial port. Software on the Iphone can access the UART using the same libraries and functions as in any UNIX software, but there is a small trick that needs to be done on the hardware end to gain access to the port. If you try to simply send data to the RX line on the Iphone, the Iphone will freeze and have to be rebooted. This tutorial was created to explain how to get past this issue. This tutorial will explain some of the basic parts and code needed to use the UART as well as the hardware trick involved in making the the RX line work and not freeze your Iphone.
Tools
The Dock Port
In the Ipod/Iphone dock port, the pins we are concerned with are as follows
To see a full description of all of the pins in the dock connector, see here: http://pinouts.ru/Devices/ipod_pinout.shtml
The Hardware Trick - Strobing the Serial Ground
If you do not use this trick, any data sent to the Iphone over the Serial RX line will cause the Iphone to freeze. Using the trick described here will allow access to the RX line and enable two way communication.
On the software end the Serial RX and TX lines of the Iphone can be accessed just like a standard serial port on any other UNIX-like system. See below for source example.
Keep the Serial Ground line (Pin 11) held at logic HIGH. Once the serial port is initialized (see code example below), strobe the Serial Ground line to LOW for at least 500 ms, then to HIGH for 500 ms then to LOW again for 500 ms, then back to HIGH and hold it at HIGH. Once this is done, you will be able to access the RX line as any other UNIX serial port read/write code would do. Here is a timing diagram of this.

Connections: Iphone RX should connect to TX of the connected device, TX to RX of the connected device, and Ground to the Ground of the connected deveice.
Serial Ground can be strobed as in the diagram above either by a logic source, like a GPIO pin on a microcontroller, or by a serial control line like RTS, DTS etc, or it can also be toggled manually by a switch by simply shorting it to real Ground.
A Source Code Example
-Overview
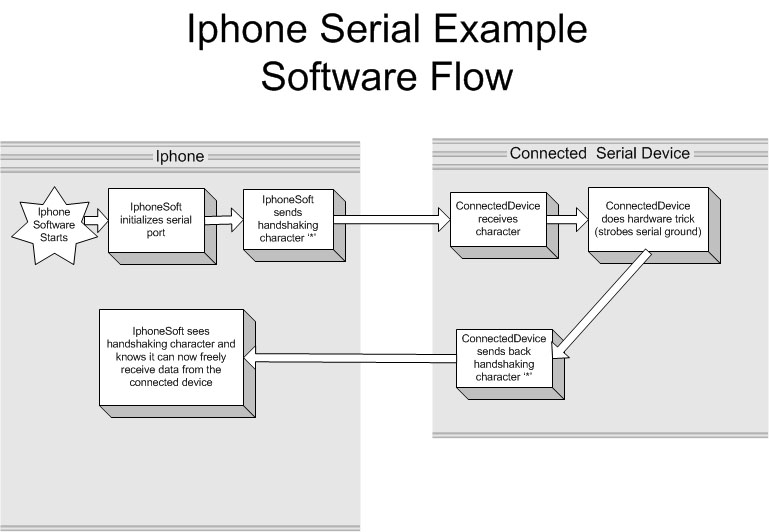
In this example I will use a PC serial port to communicate with the Iphone. Initially, only the Iphone can talk over serial to whatever serial device it is talking to, a PC or other types of devices. Since this is the case, it makes sense for our Iphone application to send out a "handshaking" message to the connected device. Then the connected device can do the hardware trick mentioned above, and the Iphone will then allow data to be sent to it over serial. Since our Iphone software doesn't know when the receiving has been enabled, the connected device can send back a "handshaking" message to tell the Iphone program that it can send data to it. So our software flow looks something like this:
Iphone Code - On the Iphone we open the device tty.iap, this is the serial port device. The code works like standard Unix serial device access code. Here is an example of opening the tty.iap serial port, setting it as no hardware flow control, 8 bit data, 19200 baud rate, and BLOCKING I/O.
The Connected Device in this case is simulated by a Windows program written in C#. The C# program receives the Handshaking message from the Iphone, and then uses the RTS line to strobe the Serial Ground pin of the Iphone at 500 ms intervals as described in the hardware trick above. It then sends the '*' handshaking message back to the Iphone to let it know that it can safely send data back and forth now. After this, you can click the "Hello Iphone!" button in the Windows program to send a string to the Iphone. The Iphone will output this string to the terminal.
Iphone Code package:
Windows C# code package (Connected device simulation):
PLEASE NOTE: It was recently brought to my attention by Morten that this trick is not necessary for Iphones with 1.1.1 and 1.1.2 firmwares.
DISCLAIMER: Interfacing electronically to the Iphone has the potential to cause severe damage to your Iphone or cause your Iphone to become non-functional. By following this tutorial you take sole responsibility and understand the risks of what you are doing.
source : http://devdot.wikispaces.com/Iphone+Serial+Port+Tutorial
Summary
This tutorial will explain how to use the serial RX and TX lines on the Iphone as a standard UART serial port. Software on the Iphone can access the UART using the same libraries and functions as in any UNIX software, but there is a small trick that needs to be done on the hardware end to gain access to the port. If you try to simply send data to the RX line on the Iphone, the Iphone will freeze and have to be rebooted. This tutorial was created to explain how to get past this issue. This tutorial will explain some of the basic parts and code needed to use the UART as well as the hardware trick involved in making the the RX line work and not freeze your Iphone.
Tools
- Unlocked and Jailbroken Iphone with BSD Subsystem installed
- Iphone development toolchain for Mac OSX, Linux, Windows (Cygwin) or other OS. I use this http://code.google.com/p/winchain/ in Windows.
- Sparkfun Ipod connector or breakout board see http://www.sparkfun.com/commerce/product_info.php?products_id=633 or http://www.sparkfun.com/commerce/product_info.php?products_id=8295
- PC USB UART - optional, but used in this tutorial. You will need either a 3.3V level UART for PC (see http://www.sparkfun.com/commerce/product_info.php?products_id=718) or you will need an old style 12V level serial cable with a level converter like this one http://www.compsys1.com/workbench/On_top_of_the_Bench/Max233_Adapter/max233_adapter.html (see warning below)
- A soldering iron will help you out :)
- Microsoft Visual Studio - optional, but used in the source code examples for the PC serial port communication.
WARNING! Do not try to use a 12V level RS232 port for this without a level converter to ~3V, it will severely damage your Iphone or render it non-functional.
The Dock Port
In the Ipod/Iphone dock port, the pins we are concerned with are as follows
| Pin 1 |
Ground |
| Pin 11 |
Serial Ground |
| Pin 12 |
TX also known as Serial Transmit |
| Pin 13 |
RX also known as Serial Receive |
The Hardware Trick - Strobing the Serial Ground
If you do not use this trick, any data sent to the Iphone over the Serial RX line will cause the Iphone to freeze. Using the trick described here will allow access to the RX line and enable two way communication.
On the software end the Serial RX and TX lines of the Iphone can be accessed just like a standard serial port on any other UNIX-like system. See below for source example.
Keep the Serial Ground line (Pin 11) held at logic HIGH. Once the serial port is initialized (see code example below), strobe the Serial Ground line to LOW for at least 500 ms, then to HIGH for 500 ms then to LOW again for 500 ms, then back to HIGH and hold it at HIGH. Once this is done, you will be able to access the RX line as any other UNIX serial port read/write code would do. Here is a timing diagram of this.
Connections: Iphone RX should connect to TX of the connected device, TX to RX of the connected device, and Ground to the Ground of the connected deveice.
Serial Ground can be strobed as in the diagram above either by a logic source, like a GPIO pin on a microcontroller, or by a serial control line like RTS, DTS etc, or it can also be toggled manually by a switch by simply shorting it to real Ground.
A Source Code Example
-Overview
In this example I will use a PC serial port to communicate with the Iphone. Initially, only the Iphone can talk over serial to whatever serial device it is talking to, a PC or other types of devices. Since this is the case, it makes sense for our Iphone application to send out a "handshaking" message to the connected device. Then the connected device can do the hardware trick mentioned above, and the Iphone will then allow data to be sent to it over serial. Since our Iphone software doesn't know when the receiving has been enabled, the connected device can send back a "handshaking" message to tell the Iphone program that it can send data to it. So our software flow looks something like this:
Iphone Code - On the Iphone we open the device tty.iap, this is the serial port device. The code works like standard Unix serial device access code. Here is an example of opening the tty.iap serial port, setting it as no hardware flow control, 8 bit data, 19200 baud rate, and BLOCKING I/O.
#include <stdio.h> /* Standard input/output definitions */
#include <string.h> /* String function definitions */
#include <unistd.h> /* UNIX standard function definitions */
#include <fcntl.h> /* File control definitions */
#include <errno.h> /* Error number definitions */
#include <termios.h> /* POSIX terminal control definitions */


static struct termios gOriginalTTYAttrs;

static int OpenSerialPort()

{
 int fileDescriptor = -1;
 int handshake;
 struct termios options;
// Open the serial port read/write, with no controlling terminal,
and don't wait for a connection.
// The O_NONBLOCK flag also causes subsequent I/O on the device
to be non-blocking.
// See open(2) ("man 2 open") for details.


 fileDescriptor = open("/dev/tty.iap",
 O_RDWR | O_NOCTTY | O_NONBLOCK);

 if (fileDescriptor == -1) {
  printf("Error opening serial port %s - %s(%d).\n",
 "/dev/tty.iap", strerror(errno), errno);
  goto error;
 }
// Note that open() follows POSIX semantics: multiple open() calls
// to the same file will succeed
// unless the TIOCEXCL ioctl is issued.
// This will prevent additional opens except by root-owned
// processes.
// See tty(4) ("man 4 tty") and ioctl(2) ("man 2 ioctl") for details.

 if (ioctl(fileDescriptor, TIOCEXCL) == -1) {
  printf("Error setting TIOCEXCL on %s - %s(%d).\n",
 "/dev/tty.iap", strerror(errno), errno);
  goto error;
  }
// Now that the device is open,
// clear the O_NONBLOCK flag so subsequent I/O will block.
// See fcntl(2) ("man 2 fcntl") for details.

 if (fcntl(fileDescriptor, F_SETFL, 0) == -1) {
   printf("Error clearing O_NONBLOCK %s - %s(%d).\n",
 "/dev/tty.iap", strerror(errno), errno);
   goto error;
  }
// Get the current options and save them
// so we can restore the default settings later.

 if (tcgetattr(fileDescriptor, &gOriginalTTYAttrs) == -1) {
   printf("Error getting tty attributes %s - %s(%d).\n",
 "/dev/tty.iap", strerror(errno), errno);
   goto error;
 }
// The serial port attributes such as
// timeouts and baud rate are set by modifying the termios
// structure and then calling tcsetattr() to cause the changes
// to take effect. Note that the
// changes will not become effective without the tcsetattr() call.
// See tcsetattr(4) ("man 4 tcsetattr") for details.

 options = gOriginalTTYAttrs;
// Print the current input and output baud rates.
// See tcsetattr(4) ("man 4 tcsetattr") for details.

 printf("Current input baud rate is %d\n",
 (int) cfgetispeed(&options));
 printf("Current output baud rate is %d\n",
 (int) cfgetospeed(&options));
// Set raw input (non-canonical) mode,
// with reads blocking until either
// a single character // has been received or a one second timeout
// expires. See tcsetattr(4) ("man 4 tcsetattr") and termios(4)
// ("man 4 termios")
// for details.

 cfmakeraw(&options); options.c_cc[VMIN] = 1;
 options.c_cc[VTIME] = 10;
// The baud rate, word length, and handshake options can be set
// as follows:
 cfsetspeed(&options, B19200); // Set 19200 baud
 options.c_cflag |= (CS8); // RTS flow control of input


 printf("Input baud rate changed to %d\n",
 (int) cfgetispeed(&options));
 printf("Output baud rate changed to %d\n",
 (int) cfgetospeed(&options));
// Cause the new options to take effect immediately.

 if (tcsetattr(fileDescriptor, TCSANOW, &options) == -1) {
  printf("Error setting tty attributes %s - %s(%d).\n",
 "/dev/tty.iap", strerror(errno), errno);
  goto error;
 } // Success
 return fileDescriptor;   // Failure "/dev/tty.iap"

 error:
 if (fileDescriptor != -1) {
  close(fileDescriptor);
 }
 return -1;
}
int main(int args, char *argv[])
{
 int fd; char somechar[8];
 fd=OpenSerialPort();
// Open tty.iap with no hardware control,
// 8 bit, BLOCKING and at 19200 baud
 if(fd>-1)
 {
  write(fd,"*",1);
 // Write handshaking message over serial
 // After this, our device or our PC program should be
 // strobing serial ground to gain access
 // to the Iphone Serial Line


 read(fd,&somechar[0],1);
 // Read 1 byte over serial.
 // This will block (wait) untill the byte has been received


if(somechar[0]=='*')
 // Check if this byte is a "handshaking" message
 {
 printf("Serial connection established!\n");
 // If it is, we have established a connection to the
 device and can freely read/write over serial!
 while(1)
// Do this forever or untill someone presses CTRL+C
{
 read(fd,&somechar[0],1);
// Read a character over serial!
 putchar(somechar[0]); // Write the character to the Terminal!!
   }
  }
 }
return 0;
}
The Connected Device in this case is simulated by a Windows program written in C#. The C# program receives the Handshaking message from the Iphone, and then uses the RTS line to strobe the Serial Ground pin of the Iphone at 500 ms intervals as described in the hardware trick above. It then sends the '*' handshaking message back to the Iphone to let it know that it can safely send data back and forth now. After this, you can click the "Hello Iphone!" button in the Windows program to send a string to the Iphone. The Iphone will output this string to the terminal.
Iphone Code package:
 invalid-file
Windows C# code package (Connected device simulation):


