제작자는 홈페이지 첫머리에 주의사항을 써놓고, 이걸 따라해서 생기는 문제는 전적으로
해당 사용자의 책임이라 못박아두고 있다.
조심해서 사용하자...
Disclaimer:
- Use this tutorial at your own risk!
- I cannot be held responsible if you damage your phone, even if you follow my instructions exactly.
- If you have questions, contact me via PM on http://www.howardforums.com/ - my handle is 'xlr8'.
- Be sure you've read the entire guide to be sure your question isn't answered somewhere in it.
- DO NOT E-MAIL ME ABOUT THIS. PM via Howard Forums only. I'm serious about this.
- By keeping this page open and reading the information below, you agree to these stipulations.
실제 필요한 장비에 대한 설명들이다.
모토로라의 Vxxx 모델과 USB케이블,
P2Kman(데이터 업다운하는 프로그램)과 헥사 에디터인 XVI32가 필요하다.
What You'll Need:
- A Motorola Vxxx Phone (V300, V400, V500, V600, etc)
- A USB Cable for your Motorola Vxxx Phone (no, you can't do it through bluetooth)
- P2Kman, a program to upload and download seems and files to and from your Vxxx
- XVI32, a simple but powerful hex editor
- A list of potential hacks you can perform
친절하게도 필요한것들을 어디서 구할수 있는지도 알려주고 있다. ㅋㅋ
Where To Get What You'll Need:
- If you don't have a Motorola Vxxx Phone, stop reading now or go to http://www.mot.com/ and buy one.
- A USB Cable for your Motorola Vxxx can be found at http://www.mot.com/ as well, but eBay typically has them pretty cheap. Avoid the 'futuredial' cable; it doesn't work very well.
- P2Kman is available here: http://www.motomodders.net/
- XVI32 is available here: http://www.handshake.de/user/chmaas/delphi/download/xvi32.zip
- A master list of hacks is here: http://xlr8.us/hofo/map.txt (compiled from various sources... I do not take credit for all of these)
- If you have a P2K05 phone (V3xx or Maxx V6), a master list of hacks is here: http://xlr8.us/hofo/map_p2k05.txt (compiled from various sources... I do not take credit for all of these)
참고 사이트들도 있으니 찾아보길바란다.
Additional Resources:
- Howard's Motorola Forum: http://motorola.howardforums.com/
- MotoModders: http://www.motomodders.net/ (alternate download links available here)
- P2Kseem: http://anton.tbg.ru/files/p2kseem.zip (from the author of P2Kman, this is an all-in-one seem editor... XLR8 recommends - great stuff!)
- P2Kmenu: http://max.h15.ru/P2KMenuEditor_22.zip (a great program to assist you in manipulating your mma files... XLR8 recommends)
- Hex/Decimal/Binary Converter: http://www.iboost.com/tools/number.htm
- RGB to Hex Color Converter and Preview Tool: http://www.creativepro.com/eservices/rgb_to_hex
- XLR8's V551 Reflash Files: http://xlr8.us/hofo/flash/
먼저 P2Kman을 컴퓨터에 설치를 한다.
해당 휴대폰 드라이버 까는 것등의 설명은 생략한다.
Installation:
- First install Mobile Phone Tools. It should come with your USB cable, or you can try to find a copy on the web somewhere. You don't specifically need the program to customize your Vxxx, but the USB driver that comes with it is necessary. P2Kman includes it, I think, but I installed MPT first, so I'm not sure if this step is necessary or not. MPT rocks - install it. You'll like it.
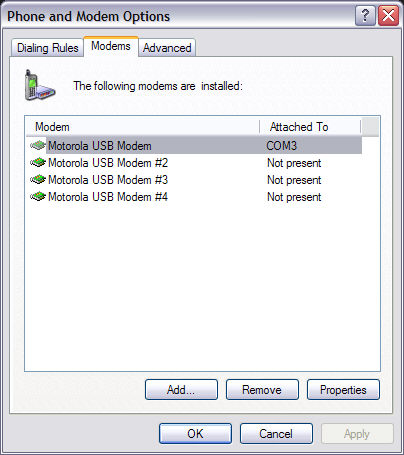
- To verify installation of the USB driver, connect your phone to the computer via the USB cable and go to Control Panel > Phone and Modem Options and select the "Modems" tab. You should see one (or more) copies of 'Motorola USB Modem' and one of them should have a COM port underneath 'Attached To'.
드라이버의 설치이후에 p2kman을 설치하게 된느데, 간단하다고 설명한다.
p2kman을 설치하게 되면 아래의 드라이버들이 설치된다고 한다.
- Next, install P2Kman. Installation is as simple as unzipping the archive and running p2kman.exe. Have your phone plugged in to the USB cable and the USB cable plugged in to your computer. When you first run P2Kman, a bunch of drivers will install:
- Motorola USB Device: Accessories Interface
- Motorola USB Device: Communications Class - Communications Interface
- Motorola USB Device: Communications Class - Data Interface
- Motorola USB Device: Data Logging DSP Interface
- Motorola USB Device: Data Logging MCU Interface
- Motorola USB Device: Test Command Interface
- Sound, video and game Controllers: USB Audio Device
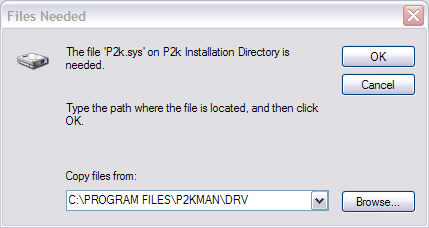
드라이버를 설치하지 못했다면, p2kman 폴더에서 drv폴더의 p2k.sys를 설치한다.
- If Windows can't find the driver (pretty likely), you'll need to point it to the directory where you unzipped P2Kman. There should be a subdirectory called 'drv' in there. That's where the driver for all these devices is. It's called p2k.sys.
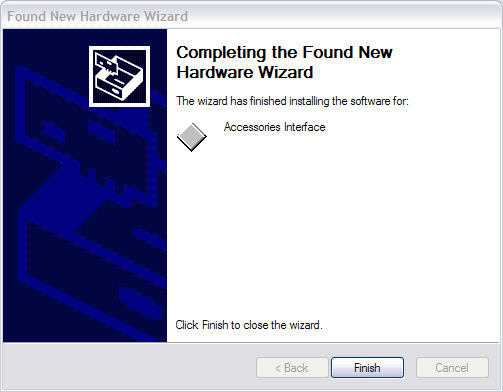
설치가 끝나면 아래 스크린 샷이 보일것이다.
- If you get the Completing Found New Hardware Wizard a bunch of times, that's good.
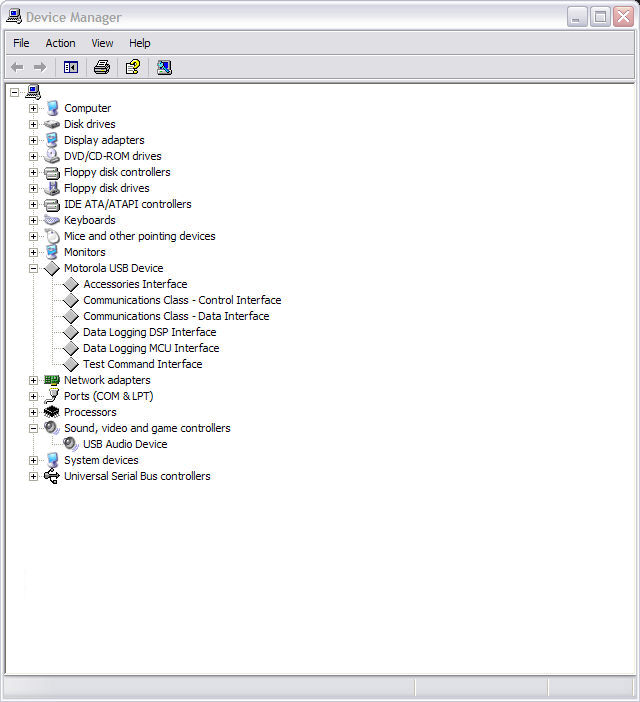
설치가 잘되었는지 확인하는 방법은 제어판으로 가서 장치관리자를 보면된다.
- To verify everything's installed, double check that everything is in your device manager. Right Click My Computer > Properties > Hardware > Device Manager.
p2kman이 연결되면, 'connected'가 표시된다.
그리고 헥사 에디터인 XVI32를 설치하면 준비과정은 끝난다.
- When P2Kman says 'Connected' (bottom left of the status bar) and you can get a file listing (click "Update list"), you're in business. You may have to restart P2Kman.
- Finally, install XVI32. It's as easy as unzipping the archive and running XVI32.exe. (No strings this time - it doesn't require any drivers.)
Using P2Kman to Download and Upload:
Downloading the Files You'll Need to Edit:
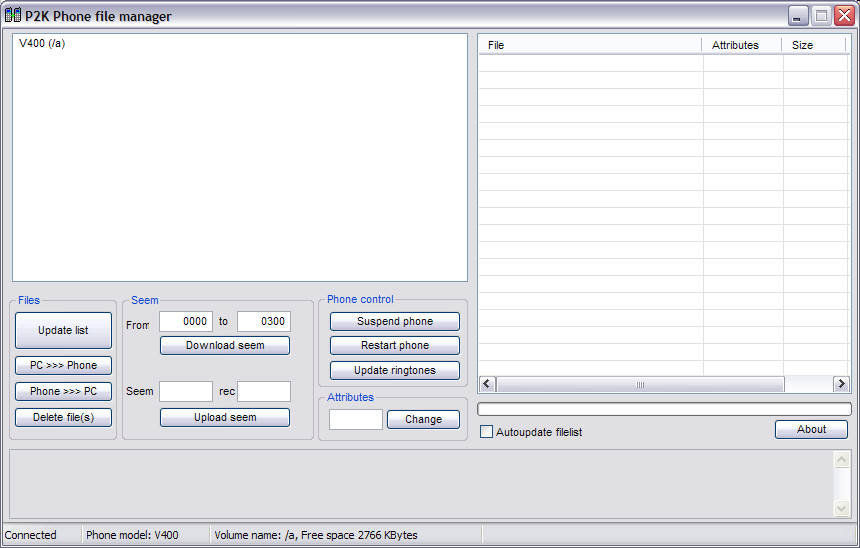
먼저 휴대폰을 컴퓨터와 연결한뒤 p2kman을 실행시키면, 'connected'가 뜬다.
아래 리스트에 있는 'seem'파일을 다운로드한다.
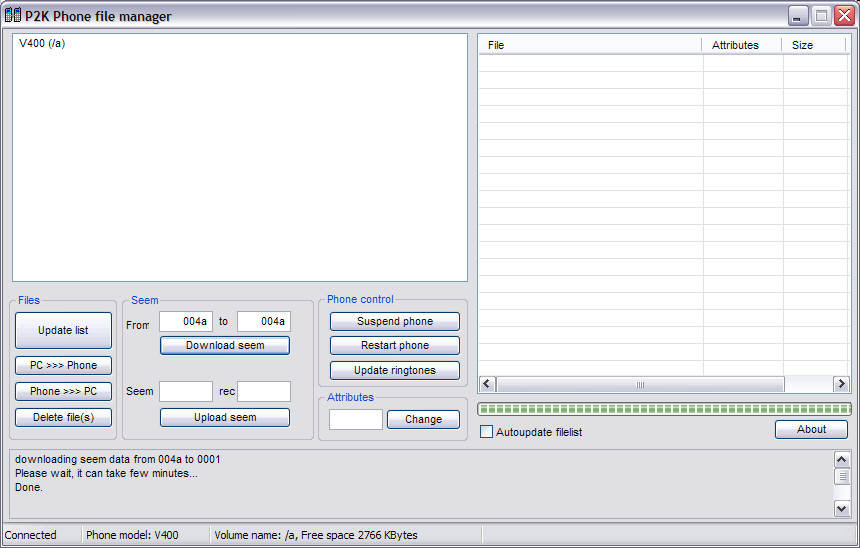
다운로드를 하기위해서는 004a_0001.seem 파일의 경우,
From box에 '004a'를 'to'box에 '004a'를 치고 다운로드 버튼을 누른다.
- Connect your phone to your computer, open P2Kman, and wait for it to say 'Connected' and get a file listing.
- We're going to download a few 'seem' files and some other files from your phone. We'll start with the seem files.
- You'll see a box at the bottom center of P2Kman called "Seem." In it, you'll see some text boxes and two buttons: "Download seem" and "Upload seem".
- We need the following seem files:
- 0025_0001.seem
- 004a_0001.seem
- 0032_0001.seem
- 0061_0001.seem
- 0062_0001.seem
- 010a_0001.seem
- 0126_0001.seem
- 01a8_0001.seem
- To get these seem files, we type the first number in the "From" and "to" boxes.
- So to get 004a_0001.seem type "004a" into the "From" box and "004a" into the "to" box. Then click "Download seem".
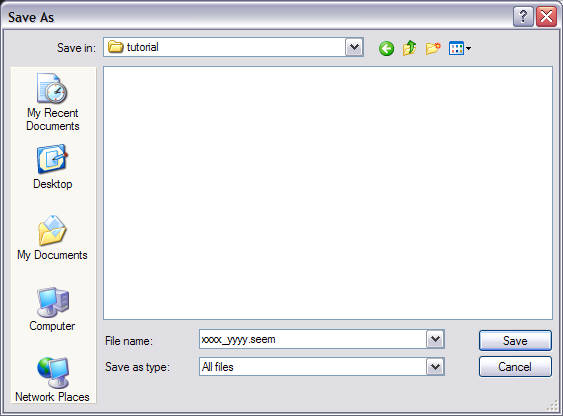
save as 버튼을 눌러서 다른 이름으로 저장을 한다. xxxx_yyyy.seem
- A "Save As" dialog will come up. Browse to the directory where you want to save your files. Where it says file name, LEAVE THAT AS "xxxx_yyyy.seem" - this is important, because it won't save the seem if you change the name from that.
다른 파일들도 같은 과정을 거친다.
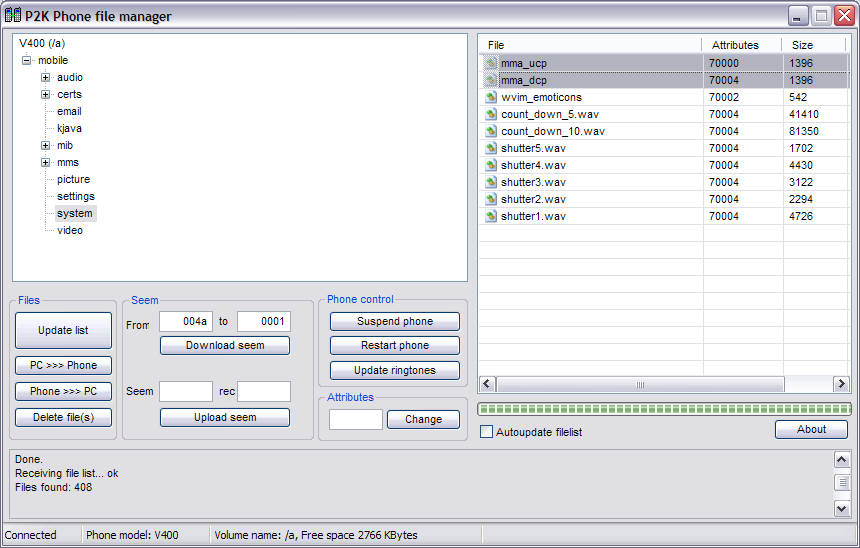
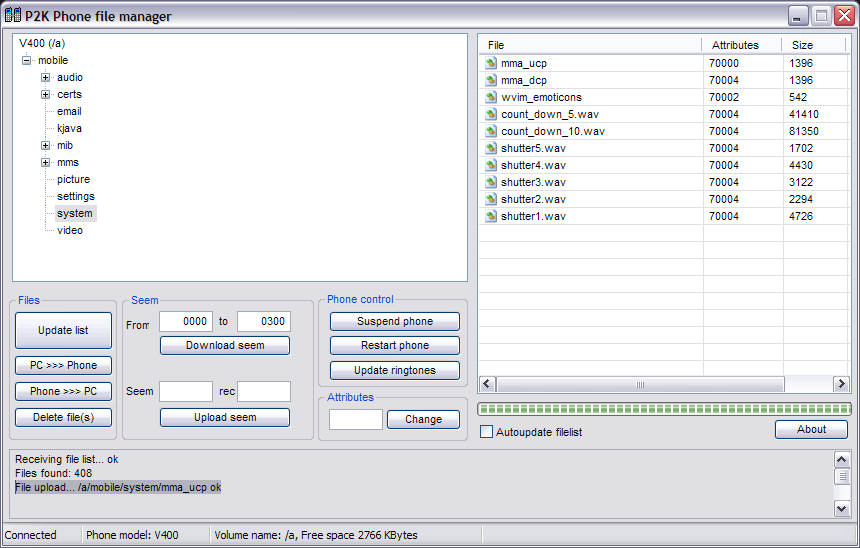
system으로 가서, mma_ucp와 mma_dcp를 가져와야 한다.
두 파일을 클릭한뒤 phone>>pc 를 클릭해서 다운로드한다.
- Repeat this process to get the other seems you need.
- We also need a few other files from the phone.
- If you haven't gotten a file listing from P2Kman yet, you can do so by clicking the "Update list" button in the Files area.
- Expand the directory tree (upper left portion of the window) and find the "system" folder.
- You need to find the files "mma_ucp" and "mma_dcp".
- Highlight them and click "Phone >>> PC". You can then save these files to your computer.
또한 gain_table.bin 파일도 있어야 하니 루트쪽에 있는 것을 다운로드 한다.
제작자가 또 강조하는 것은 꼭 백업파일을 만들라는 것. 조심해서 사용하자...
결국 이 다운로드한것을 고쳐서 업로드해서 해킹을 하는 것이니,
일단 다운받은것들은 백업파일을 만들어서 보관한후 카피본으로 작업을 하자.
- We also need the file "gain_table.bin" and it's in the root directory on the directory tree: "Vxxx (/a)".
- Download it the same way you got the mma files.
- VERY IMPORTANT: Make backup copies of all of the files you got off your phone. This is extremely important, because if you mess something up, you can always go back to 'the way things were' before you starting changing things.
Uploading Edited Files to the Phone:
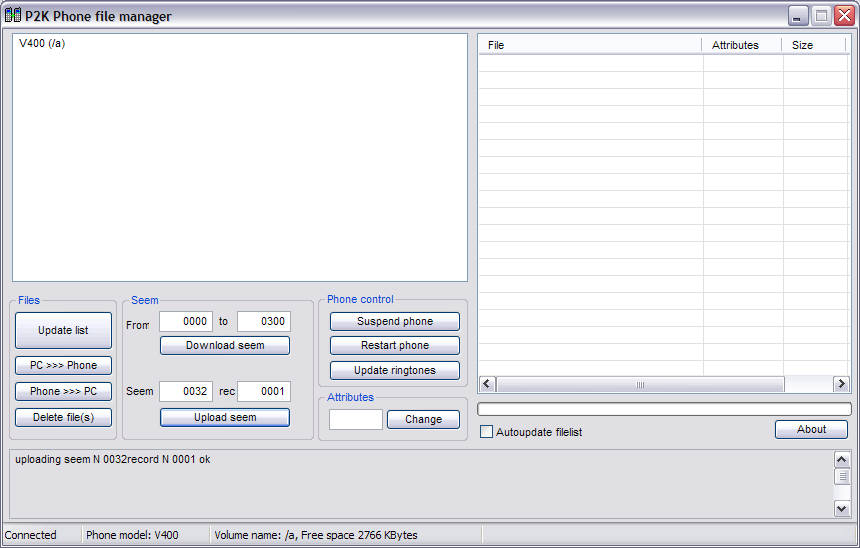
수정한 파일들을 업로드 시키는 방법인데, 간단하다.
업로드할 파일이 0032_0001.seem이라면,
seem number에 0032를 record에 0001을 기입한다.
그리고 업로드 버튼을 클릭하면된다. 업로드가 성공했다면
'uploading seem N 0032record N 0001 ok'라는 문구가 뜬다.
- Connect your phone to your computer, open P2Kman, and wait for it to say 'Connected' and get a file listing.
- If you want to upload a seem file, enter the seem and record number in the "Seem" and "rec" boxes.
- For example, for 0032_0001.seem, the seem number is 0032 and the record number is 0001.
- Then click the "Upload seem" button, browse to the folder where the modified seem file is, and click ok.
- If you're successful, you'll see "uploading seem N 0032record N 0001 ok" - the "ok" at the end means you've done it properly.
일반 파일의 업로드도 동일한방법. 따로 해석하지는 않겠다.
- If you want to upload a regular file to your phone, the process is similar.
- You must select the directory you wish to upload the file to in the directory tree area.
- For example, the mma_ucp file needs to be uploaded to "/a/mobile/system/" so be sure to select "system" in the directory tree.

- Then click "PC >>> Phone" and find the modified file, and click ok.
- If you're successful, you'll see "File upload... /a/mobile/system/mma_ucp ok" - the "ok" at the end means you've done it properly.
- Note that mma_ucp and mma_dcp must be uploaded to "/a/mobile/system/" and gain_table.bin must be uploaded to "/a/".
- Now click "Restart phone" and once your phone reboots, double check that the appropriate changes were made.
실제로 순서는 다운로드->헥사 에디트를 이용한 파일 수정->업로드 순이다.
HEX Editing with XVI32:
Overview:
- First let's take a look at XVI32 and familiarize ourselves with its features.
- Open XVI32 and open the 0032_0001.seem in XVI32 just to take a look.
- On the main screen, you'll see two columns. On the left side is the "HEX" representation of the file. On the right side is the "ASCII" or text representation of the file.
- When one of the columns is shaded, that means it's inactive and you're working with the other side. In the screenshot below, you'll see that I'm working with the "HEX" side.
- Take a look at the status bar at the bottom of the screen. You'll see "Adr. Hex" when you're working with the "HEX" side. This is the hex offset, or the location of where you are in the file. This is very important. I'm at offset 35 right now.
- [Screen Shot]
- One last thing, when working with SEEM files, each hex offset has eight bits or "switches" which can control up to eight different settings on your phone. When we adjust one of these settings we have to change the proper bit. XVI32 has a nice tool called "Bit Manipulation" under the tools menu. Go ahead and select it. You'll see that for the offset that I'm looking at, bits 7, 6, 5, and 3 are checked or set to "1". Bits 4, 2, 1, and 0 are unchecked or set to "0". When adjusting settings in the SEEM files, you'll be referred to an offset and a bit within that offset to adjust. Use the bit manipulator to do this and only change the bit that is referenced. Remember, checking the box sets that bit to 1 and unchecking the box sets it to 0. Be sure to click "Set" after you check or uncheck to actually make the changes in the file.
- [Screen Shot]
Adjusting Gain (Volume) Settings:
- Open gain_table.bin in XVI32.
- To adjust the earpiece gain, go to offset 0D (in Adr. Hex, you'll only see "D"). The default value is 01, and you can adjust the settings in the gain_table.bin from 00 to 08. "00" is silent, and "08" is as loud as possible. You'll see that I've changed my earpiece gain to 08.
- [Screen Shot]
- Save the file, upload it to your phone, reset the attribute to "4", and restart.
- For a list of all settings we've found so far that you can change in gain_table.bin, see http://xlr8.us/hofo/map.txt.
Activating/Deactivating Phone Functions by Adjusting Seem Settings:
- Open the 0032_0001.seem file in XVI32.
- Say you want to activate SMS Delivery Reports.
- Take a look at http://xlr8.us/hofo/map.txt and you'll see that SMS Delivery Reports are in offset 3D, bit #1 and that to turn it on bit #1 must be set to "1".
- So go to offset 3D in the 0032_0001.seem and then select Tools > Bit Manipulation.
- You'll see that bit #1 is unchecked meaning it's set to "0".
- [Screen Shot]
- Check it and that will set it to "1". Click "Set" and you'll notice that the value in offset 3D changed.
- [Screen Shot]
- Important: Leave all the other bits alone - do not change them. Other bits may be checked or unchecked, but don't worry about it.
- Save the file, upload it to your phone, and restart.
- NOTE: If you activated Engineering, AIM, IM, MobileQQ, or Videos and the menu item does not appear, you may be required to update your menu file. See the section below titled "Activating Menu Items for Special Features".
- For a list of all settings we've found so far that you can change in the seem files, see http://xlr8.us/hofo/map.txt.
Special Cases:
Custom Outer LCD Text:
- First you need to activate the feature by opening 004a_001.seem and setting offset 27 to "01".
- Of course, you want to be able to control what shows up in your outer LCD.
- Open 0061_0001.seem.
- Take a look at the text side of that file and you'll see the text that gets displayed.
- Mine says "Cingular". You can change the text that's displayed by altering the values on the text side of the hex editor.
- [Screen Shot]
- Note that there must be a hex value of "00" in between each character that is to be displayed.
- Also note that to specify the end of the display, you must put hex values of "00" twice. Then be sure the rest of the file is filled with hex values of "FF".
- Make the exact same changes to 0062_0001.seem - it's a backup file on your phone for the 0061_0001.seem.
- Upload all of these seems (004a_0001, 0061_0001, and 0062_0001) to your phone and restart to see the change.
Date/'GPRS' Display Under Carrier Name:
- The text displayed when GPRS "attaches" (the icon with the white box with blue pentagons above and below it beside your signal strength) is stored in seem 01a8_0001.
- It can be annoying because this text overwrites the date on your phone, and a lot of people don't like that. But there are some very quick fixes.
- Do you want the date to always display? Upload this file: http://xlr8.us/hofo/01a8_0001_datealways.zip.
- Do you want nothing at all to display? Upload this file: http://xlr8.us/hofo/01a8_0001_nothing.zip.
- Do you want your own custom text to display? Download this file and edit it the way I'm about to tell you: http://xlr8.us/hofo/01a8_0001_custom.zip.
- Open the custom file in XVI32 and you'll see that I have mine set to display "XLR8" (of course). You can change the text that's displayed by altering the values on the text side of the hex editor.
- Note that there must be a hex value of "00" in between each character that is to be displayed.
- Also note that to specify the end of the display, you must put hex values of "00" twice. Then be sure the rest of the file is filled with hex values of "FF".
- Save, upload, and restart to see the changes!
- You may also get 'GPRS Active' displayed when you're actually in a web session. You can turn that off and keep whatever display you have based on the 01a8_0001.seem.
- All you need to do is go into the 0032_0001.seem and change offset 60, bit #0 to "0" - that will turn off the 'GPRS Active' text along with the GPRS PDP Context icon (the square with the rays of sun).
- Save, upload, and restart to see the changes!
Activating Custom Startup and Shutdown Animation:
- First you need to turn off the Motorola OEM Startup/Shutdown animation.
- The moto startup is in 0032_0001.seem at offset 1D, bit #3.
- The moto shutdown is in 0032_0001.seem at offset 31, bit #0.
- Now you need to turn on the Custom Startup/Shutdown animation.
- The custom startup is in 004a_0001.seem at offset 23. Set this offset to "01" to turn it on.
- The custom shutdown is in 0032_0001.seem at offset 46, bit #0.
- When custom startup and shutdown is activated, your phone looks in seems 0206_0001, 0207_0001, 0208_0001, and 0209_0001 for the name of the animated gif to display. 0206 and 0208 are for startup and 0207 and 0209 are for shutdown.
- If you have problems, take a look at these seems, but most likely the files are "/a/custwakeup.gif" and "/a/custgoodbye.gif".
- Make some animated GIFs that are 176x220 pixels and upload them to your phone as those filenames. I would recommend that the files aren't too big or too lengthy in animation, but I'm not sure what the maximums are.
Activating Menu Items for Special Features:
- You may be saying... hang on, I activated the AIM feature and nothing shows up! What's wrong?
- Well, despite the fact that you activated the feature, your phone may not have that feature in its menu for you to access it. It depends on which flex you're running - provider-branded flexes are notorious for removing menu items to make space for crap like "Cingular Mall" and "mMode".
- To put those removed items back in your menu, this requires working with your mma_ucp and mma_dcp files. Those files specify the menu layout on your phone.
- Open mma_ucp in XVI32 and resize the width so that the first row goes from offset 00 to offset 15. If you look on the text side of the editor, you'll see that this makes things a bit easier to read.
- [Screen Shot]
- Take a look on the text side of XVI32, and you'll notice some familiar text. It's all of your menu items!
- Unfortunately, simply adding a row with the new menu item doesn't seem to work, so you'll actually have to replace an existing menu item to get the new feature you want.
- Also, adjusting the main menu can sometimes not work the way you expect it to, especially on provider-branded flexes, so I would recommend not changing anything on that menu.
- Note that each menu item starts with "A" or "@" - don't change that.
- So, to add an item, simply find a menu item you don't want around anymore and replace it with the new menu item.
- You'll need to use the proper menu code for it, but in most cases, it's pretty intuitive.
- As an example, I'm going to replace "SIM Applications" in Office Tools with AIM.
- Find where it says "SIMApp" in your file.
- [Screen Shot]
- Replace that with "AIM" and fill the extra spaces with hex values of "00".
- It does, in fact say "AAIM" because of that beginning "A" thing I already mentioned. That's ok.
- [Screen Shot]
- Save the file. Make the exact same changes to mma_dcp and upload both of them back to your phone in /a/mobile/system/.
- Reset the file attribute on mma_dcp to "4" ... the attribute for mma_ucp stays "0". Then restart.
- For a list of frequently missing menu codes, see http://xlr8.us/hofo/map.txt.
Custom Color Styles:
- This hack will allow you to add your own custom color style to the Settings > Personalize > Color Style menu.
- First, you need to activate the feature in the 0032_0001.seem at offset 53, bit #6.
- The custom colors are stored in a file called "/a/mobile/system/spcolor.sch" - your phone may have this file on it already, depending on your flex. If your phone doesn't have this file, download my own custom color scheme here: http://xlr8.us/hofo/spcolor.zip.
- If you activate this feature in the seem and upload my spcolor.sch file to the /a/mobile/system/ directory of your phone, you'll find a new color scheme called "Sleek". Of course, that's what I named it, but you'll be able to name yours whatever you want.
- So what we need to do is hex edit the spcolor.sch so that you can put in your favorite colors. Now this file stores the colors using hexadecimal RGB. If you're familiar with web design, this is how colors are specified in HTML. For example FFFFFF is white and 000000 is black. There's a really great tool at http://www.creativepro.com/eservices/rgb_to_hex that you can use to convert colors and actually see them as well.
- The locations of the different colors and what they do is at http://xlr8.us/hofo/map.txt. Now, each color is actually a six digit hexadecimal number, but each offset in the file only stores two digits. So the colors are actually stored in three successive offsets. The offset referred to in the "map" file is the starting point.
- For example, let's change the "upper color bottom bar". The color starts at offset 78, but the hexadecimal number representing the color is actually stored in offsets 78, 79, and 7A.
- Right now, in my spcolor.sch, you'll see that the color there is F6C6D7, which is a pinkish color.
- [Screen Shot]
- So let's change the "upper color bottom bar" from F6C6D7 to FF1432 which is a nice bright red color. (Use the tool I referred to before to preview your colors.) All you have to do is put "FF" in offset 78, "14" in offset 79, and "32" in offset 7A.
- [Screen Shot]
- Maybe you'd also like to change the name of the color style. "Sleek" just isn't for you. Take a look at the offsets I've highlighted in the screen shot on the text side of XVI32.
- [Screen Shot]
- All you have to do is change the text to whatever you want it to be. Make sure there's a "00" hex value in between each letter, and don't try to put too much text in there. You only have so much space. I've changed mine to "XLR8" - that seems a bit more fitting.
- [Screen Shot]
- Save the file, upload it to your phone, and restart.
- For a list of all the color settings we've found so far that you can change, see http://xlr8.us/hofo/map.txt.
Troubleshooting:
- I can't get P2Kman to recognize my phone.
- Did all the drivers install properly?
- Did you try restarting your phone and trying it again?
- Did you try restarting your computer and trying it again?
- What type of USB cable are you using? I hope it's a Motorola OEM one.
- Did you install MPT first? Is the phone recognized using that software?
- Is the phone recognized as "Motorola USB Modem" when you first plug it in?
- Does Windows recognize that there is any type of USB device plugged in? Check the device manager.
- Did you try installing PST? That sometimes works. I can't tell you where to get it, though, as it's not freeware.
- Have you tried manually installing the drivers? Go to Control Panel > Add New Hardware > Select from List > Have Disk and point to drv/p2k.inf in the P2Kman folder.
- I uploaded my edited gain_table.bin to my phone and I don't notice any difference.
- Did you change the correct offset?
- Was the value you changed the offset to between 00 and 08?
- Did you save the gain_table.bin before you uploaded it?
- Did you set the upload path on P2Kman to "/a/"?
- Did you use the "PC >>> Phone" button? (Don't use the "Upload seem" button!)
- Did you restart your phone?
- I uploaded the seem to my phone and I don't notice any difference.
- Did you change the correct bit of the correct offset?
- Did you save the seem before you uploaded it?
- Did you enter the correct seem and record number in P2Kman properly?
- Did you use the "Upload seem" button? (Don't use the "PC >>> Phone" button!)
- Did you restart your phone?
- Was your change Engineering, AIM, IM, Mobile QQ, Videos, Bluetooth, or Quick Menu?
- If so, did you check your mma_ucp and mma_dcp files? See the section "Activating Menu Items for Special Features" for more info.
Frequently Asked Questions:
- When I have my bluetooth headset paired with my phone, it uses a default ringtone instead of my custom one. How do I get it to use my custom ringtone? You can't. Sorry. That's a Motorola bug.
- I enabled advanced network menus, but manual network selection doesn't show up. How do I enable it? Adjust seem 0032, offset 02, bit 1. Unfortunately, this will likely cause your voicemail indicator to act up and you will receive text messages from ^@ and _@ whenever you get a voicemail or check it.
- I keep getting wierd text messages from ^@ and _@ and/or my voicemail indicator is always on. How do I fix this? Adjust seem 0032, offset 02, bit 1. Unfortunately, this will likely cause you to lose manual network selection.
- How do I unbrand my phone without flexing? It's not difficult. First, you'll probably want to set the outer LCD to the Motorola icon instead of the custom text, turn the custom startup/shutdown animations off in favor of the Motorola OEM ones, and turn off the custom startup/shutdown sounds. Now, we need to remove all those pesky branded menus. You'll need to replace your mma files. If you have a TRIPLETS phone (V300/400/500/600) use these Vxxx mma files. If you have a V551, use these V551 mma files. These mma files have all menus in them and no branding. Back up your original mma files and upload these new ones to /a/system/ using P2Kman. Reset the file attribute on mma_dcp to "4" ... the attribute for mma_ucp stays "0". Next (back it up first) delete the file /a/DL_DB_INET_RECORDS if it is on your phone. This file contains the "Shop Ringtones," "Shop Graphics," and "Shop Games & Apps" menus that show up in various places. Finally, (back it up first) replace /a/mib_op_greet with the Motorola OEM one so that when you startup the WAP browser you don't have branding there. Reset the file attribute to "4". Restart your phone and you'll be unbranded.
- Where can I get cool talking ringtones that say stuff like "You have an incoming call"? Right here: xlr8_talking_tones.zip. You're welcome.
- Can I make my phone vibrate and ring at the same time? If you have a TRIPLETS phone (V300/400/500/600), you're out of luck. But if you have a V551, it can be done! Seem 0032, offset 7A, bit 4. That'll do it.
- Why doesn't AIM work on my TRIPLETS phone? The AIM program on the V300/400/500/600 only works with T-Mobile USA. The settings are hardwired into the software and can't be changed, so there's not a way to make this program work with another provider. Sorry.
- How do I use the IM program? First, you'll need to setup the program with your GPRS settings so it can connect to the internet. Then, you'll need to signup for service with Yamigo and you'll be able to use the IM program.
- Can I add Bluetooth to my V300/400? You can add the menu, but it won't work. The bluetooth hardware simply isn't in the phone. Sorry.
- What are your recommended gain_table settings? I have my earpiece set to "5" so I can turn it up really loud if I'm in a loud place and need to hear. I have my ringtone and speakerphone set to "3" because anything more causes distortion and isn't good for the external speaker. I have my keypad left at "1" because it's just fine how it is. I have my system tones set to "1" because I want them much quieter, but don't want them completely turned off.
- How can I set my outer LCD backlight to stay on when the flip is open? You can't. I know you love your custom outer LCD text and want the world to see it, but it would really waste your battery.
- How do I enable 850 MHz support without flexing my T-Mobile phone? Adjust seem 0025, offset 00 so that bits 0, 1, and 3 are all "on". Also, adjust seem 0032, offset 50, bit 0 to "on". If you're a stickler for detail, grab seem 0171_0001 and change the text in there to say "Quad-Band GSM" - this is what displays in the Settings > Phone Status > Other Information > Technology menu. Restart your phone and you'll have 850 MHz support. You will likely not be able to register on any of those towers, though, due to lack of roaming agreements.
- My main menu will only show as a list, even if I select to view it by icon. How do I fix this? Your main menu must have exactly nine items in it in order to be viewed by icon. You either did some editing to your mma files and added or removed something from the main menu, or you seem edited and deactivated one of the menu items in the main menu, meaning less than nine are now showing.
- How do I make my phone ring longer/shorter before going to voicemail? This works on the Cingular network; I'm not sure about others. First you need to find your voicemail deposit number. Two ways: (1) Menu >> Settings >> Call Forward >> Voice Calls (2) Menu >> Messages >> Menu >> Voicemail Setup. The first method is the preferred one, as the second method may not give you the correct number if your deposit and retrieval numbers are different. Once you've determined your voicemail number, from your home screen, type "* 61 * (voice mail access number) ** (time in multiples of 5 ) #" and then press SEND. For example, if my voicemail access number is 404-555-1212 and I want it to ring for 20 seconds before forwarding to voicemail, I would type: *61*14045551212**20#
- My phone displays "Flex error, subsidy lock" everytime I start up my phone. How do I get rid of this? Open up P2Kman and remove the file "/a/mobile/system/secure_pds_init" then go to Settings > Personalize > Greeting and clear it out. Restart and the message will be gone.
- I click the "Update list" button in P2Kman but it won't list any files. The status bar says "connected." What's wrong? You must have a phone with removable media (transflash). Unplug your phone from the cable, remove the TF card, and reconnect your phone. Should work just fine now.
Addendum 1- P2Kman File Attributes:
- The Last Number in the attribute column of P2Kman is the file attribute.
- 0 = no attribute
- 1 = read only file (locked, cannot be deleted through phone menus)
- 2 = hidden file (cannot be seen in phone menus)
- 3 = read only and hidden
- 4 = system file (will not be deleted on master clear)
- 44 = system file and display lock icon (will not be deleted on master clear) (must enter binary 68 in the p2kman attribute box to get this since binary 68 = hex 44)
Addendum 2- GPRS Status Icons:
- The Vxxx manual does a poor job explaining the GPRS status icons.
- Icon #1 - "Three Blue Boxes" means GPRS is available on the network, but you are not "attached." You will likely never see this icon unless you set "Gp Auto Attach" to "Off" in the Engineering Menu.
- [View Icon #1]
- Icon #2 - "White Box with Blue Pentagons Above and Below" means GPRS is available and you are attached. Any text stored in seem 01a8_0001 will overwrite the date in the second line of the display when this icon appears.
- [View Icon #2]
- Icon #3 - "Small Box inside Big Box with Rays of Sunlight" means GPRS is currently active (that is, you are in a GPRS session and data can potentially be sent or received at any time). You may not see this icon when GPRS is active, depending on your flex. This status icon can be disabled in the 0032 seem, and you'd only see Icon #2 when data is being transferred. If enabled, "GPRS Active" will overwrite the date in the second line of the display when icon #3 appears.
- [View Icon #3]
- Icon #4 - "Script 'E' with Green and Red Slashes Below" means high-speed EDGE data is available. You will only see this if you have an EDGE-enabled phone (V551) and you're running a very recent firmware revision.
- [View Icon #4]
Addendum 3- Phone Malfunction:
- So you made a mistake seem editing, and now your phone turns on, but crashes immediately and you can't maintain a connection to P2Kman long enough to restore your backup seems and files.
- Take a deep breath. It can be fixed. There are a few options, which have varying degrees of success and consequences. I hope you made backups of your seem files before you edited.
- Option 1: Remove SIM
- Turn off your phone, open the back cover, take out the battery, and remove your SIM card.
- Place the battery back in the phone and turn the phone on.
- Hopefully your phone won't crash before getting to the screen that says "Insert SIM".
- If it gets there, you can connect your USB cable and upload your backup seems using P2Kman.
- Option 2: Phone Off But Charging
- This option requires a USB cable with the side port that allows the charger to be connected at the same time the USB cable is connected. (Motorola Cable SKN6311B)
- Turn your phone off, plug your charger into the side of the USB cable, and then plug the USB cable into the phone.
- After a couple of seconds, your phone will turn on and say "Charging".
- If it gets there, you can upload your backup seems using P2Kman.
- Option 3: Flash/Flex With A Monster File
- This option is the most drastic. You'll lose everything in your phone, but at least your phone won't be a paperweight any more.
- You are going to need to flash and flex your phone with a "monster" file.
- Get a monster file from here: MotoModders. Be sure to choose a monster file that won't lock your phone to a specific network.
- Turn your phone on in "Boot Loader" mode. You can do this by holding the * and # buttons while turning on the phone. The phone can be flash/flexed in this mode.
- From here, follow the instructions at mob453.com to flash and flex your phone back to working order.
- Note: When you plug your phone into the USB cable in Boot Loader mode, it will be recognized as a "S Flash Neptune" device. This is normal. You may need to point the driver installation to the p2k.sys file that came with P2Kman.
Addendum 4- MCC-MNC Codes:
- 310-410: Cingular Wireless (main network)
- 310-170: Cingular Wireless (CA/NV network, shared with T-Mobile)
- 310-150: Cingular Wireless (DCS network, Coastal GA/SC/NC/East TN)
- 310-380: AT&T Wireless (main network)
- 310-260: T-Mobile
- 310-500: PSC Wireless
- 310-490: SunCom
- 310-890: RCC/Unicel
- 311-150: Wilkes Cellular
- 334-020: Telcel GSM (Mexico)
- 310-020: Union Telephone
- 310-030: Centennial
- 310-070: Highland Cellular
- 310-090: Edge Wireless
- 310-100: Plateau Wireless
- 310-310: T-Mobile
- 310-560: Cellular One
- 310-590: Western Wireless
- 310-640: Einstein PCS
- 310-770: Iowa Wireless
- 310-950: XIT Cellular
- 311-090: Siouxland PCS
- These are networks that I've been registered on and used personally. For a full list, go here: http://www.numberingplans.com/?page=plans§ion=imsinr.
- Here's a pretty complete list of US MNC's: http://www.howardforums.com/showthread.php?p=6010572.
Addendum 5- Unlocking Web Sessions:
- On certain flexes, the web session profiles under Web Access > Web Sessions are locked and cannot be edited or deleted.
- Here's how to unlock them so you can edit them or delete them.
- Using P2Kman, download the file /a/WebSession
- Open this file in your XVI32.
- You'll see the information from each profile under Web Access > Web Sessions
- To unlock a web session, find the name of the web session in the file on the text side.
- Look at the three offsets prior to the first letter on the hex side.
- You should see 03 05 00, or you might see 01 05 00.
- Change the first number to "03" and the middle number to "04". (You should have 03 04 00.)
- Reupload the WebSession file to the /a/ directory.
- Make sure you change the attribute on the file to "4"
- Restart your phone and you can now edit or delete that web session!
Addendum 6- Unlocking the Right Soft Key:
- On certain flexes (AT&T), the right soft key is locked to mMode and cannot be changed in Settings > Personalize > Home Screen > Home Keys.
- Here's how to unlock that key (or another key, for that matter) so you can change it to what you want.
- Open the mma_ucp in XVI32 (refer to the section "Activating Menu Items for Special Features" for more info).
- Toward the top of the file, you should notice the "Browser" menu item.
- In the offset just prior to the text "Browser" you should see "E" on the text side of XVI32.
- Change that offset from "E" to "A".
- Upload mma_ucp back to the /a/system/ directory.
- Make the exact same change to mma_dcp and upload that back to the /a/system/ directory.
- Restart your phone and you can now change the right soft key to whatever you want!


![[Screen Shot]](http://xlr8.us/hofo/images/0032.jpg)
![[Screen Shot]](http://xlr8.us/hofo/images/bitmanip_7653.jpg)
![[Screen Shot]](http://xlr8.us/hofo/images/gain_table.jpg)
![[Screen Shot]](http://xlr8.us/hofo/images/bitmanip_0.jpg)
![[Screen Shot]](http://xlr8.us/hofo/images/bitmanip_1_0.jpg)
![[Screen Shot]](http://xlr8.us/hofo/images/0061.jpg)
![[Screen Shot]](http://xlr8.us/hofo/images/mmaucp.jpg)
![[Screen Shot]](http://xlr8.us/hofo/images/mmaucp2.jpg)
![[Screen Shot]](http://xlr8.us/hofo/images/mmaucp3.jpg)
![[Screen Shot]](http://xlr8.us/hofo/images/spcolor1.jpg)
![[Screen Shot]](http://xlr8.us/hofo/images/spcolor2.jpg)
![[Screen Shot]](http://xlr8.us/hofo/images/spcolor3.jpg)
![[Screen Shot]](http://xlr8.us/hofo/images/spcolor4.jpg)
![[View Icon #1]](http://xlr8.us/hofo/gprs1.jpg)
![[View Icon #2]](http://xlr8.us/hofo/gprs2.jpg)
![[View Icon #3]](http://xlr8.us/hofo/gprs3.jpg)
![[View Icon #4]](http://xlr8.us/hofo/gprs4.jpg)