- Introduction
- Setup ARToolKit
- Starting your First Example
- How does ARToolKit Work?
- Calibrating your camera
코어측에서 볼때, 소프트웨어 라이브러리의 집합체인 ARToolKit은 어플리케이션 프로그램으로 링크되어지도록 디자인되어져 있다. 이러한 이유로, ARToolKit은 소스코드들을 배포하게 되고, 반드시 OS에 따라 컴파일을 해야한다. 당신은 당신의 OS에 적합한 개발환경이 필요해 질것이다.
ARToolKit 은 멀티플랫폼에 비슷한 함수들을 제공하지만, 각 OS에 따라서 다른 설치과정을 거치게 된다. 튜토리얼에서 각 인스톨과정에 대해서 안내를 할것이다.
당신의 컴퓨터나, OS, 플랫폼은 몇가지의 간단한 요구사항이 만족되어야 한다. 하드웨어는 비디오 스트림이 가능해야하며, 비디오 프로세싱과 디스플레이를 조작할수 있어야 한다. 또한 컴파일러와 링커 오류를 피하기 위해서, 몇가지의 기본적인 소프트웨어 의존성을 가진다. 메인 패키지는 크로스 플랫폼이며(OpenGL, GLUT) 다른 것들은 각 머신에 맞는 비디오 라이브러리가 있어야 한다.(DirectShow, V4L, QuickTime)
각 OS에 따른 소프트웨어 의존성은 뒤에 나오는 인스톨 과정에서 다룬다.
Building
Building on Windows
Prerequisites(필수조건)
| Prerequisite | Instructions |
개발환경 |
Microsoft Visual Studio 6 and Microsoft Visual Studio .NET 2003 등은 지원하고, 무료 개발환경인 Cygwin등에서도 빌드가 가능하다(e.g. Cygwin,http://www.cygwin.com/) |
| DSVideoLib-0.0.8b-win32 | 윈도우에서, DSVideoLib 은 카메라 드라이버간의 통신을 조작하는데 사용되어진다. DSVideoLib-0.0.8b or later is required for ARToolKit 2.71. A source + binary package of DSVideoLib is included on the ARToolKit downloads page on sourceforge. |
| GLUT | Verify that GLUT runtime and SDK is installed. If not, you can download a binary package containing GLUT for Windows from http://www.xmission.com/~nate/glut.html Verify that you have the GLUT runtime installed in your system directory.
Verify that GLUT SDK is installed in your Visual C++ installation:
|
| DirectX Runtime | Verify that DirectX runtime is installed: with Windows XP it is installed by default. You need to check your version; it must be 9.0b or later. |
| Video input device | Plug your camera or video input into your PC and install any necessary drivers. Verify that your camera has a VFW or WDM driver by running the program amcap.exe (this can be found in the DirectX SDK, in Samples\C++\DirectShow\Bin). Check for your camera in the Devices menu (see Figure 1). 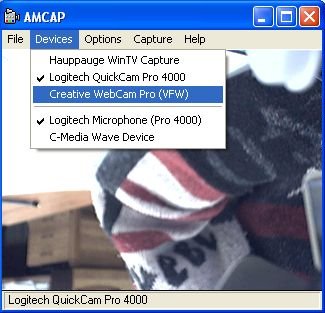 Figure 1: amcap Screenshot |
| (Optional, for VRML renderer only) OpenVRML-0.14.3-win32 | A source + binary package of OpenVRML is included on the ARToolKit downloads page on sourceforge. |
Building ARToolKit
ARToolKit을 빌드하기. 빌드스텝:
- ARToolKit.zip파일의 압축을 편한 폴더에 푼다. 이후에는 {ARToolKit}로 표기.
- DSVideoLib zip파일을 {ARToolKit}폴더에 풀어놓는다. 디렉토리이름은 "DSVL"로 저장.
- DSVL.dll 과 DSVLd.dll 파일을 {ARToolKit}\DSVL\bin 에서 {ARToolKit}\bin 로 복사한다.
- GLUT DLL 파일을 Windows System32 폴더로 인스톨한다., library 와 headers 파일들을 VS platform SDK 폴더로 복사한다.
- {ARToolKit}\Configure.win32.bat 스크립트를 실행해 include/AR/config.h. 파일을 만든다
- ARToolKit.sln file (VS.NET)을 열거나 ARToolkit.dsw file (VS6)을 연다. 툴에 따라 선택한다.
- 툴킷을 빌드한다.
VRML 라이브러리와 예제의 선택 렌더링. (libARvrml & simpleVRML):
- OpenVRML zip 파일을 {ARToolKit}로 푼다..
- js32.dll 파일을 {ARToolKit}\OpenVRML\bin 에서 {ARToolKit}\bin로 복사한다.
- VS configuration manager에서 libARvrml and simpleVRML 프로젝트를 인에이블 시키고 빌드한다.
Linux / SGI Irix.
Prerequisites
| Prerequisite | Instructions |
| OpenGL and GLUT | Verify that OpenGL and GLUT RunTimes are installed: You need to find opengl.so, glu.so, and glut.so, generally in /usr/X11R6/lib, /usr/lib, or /usr/local/lib. Verify that OpenGL and GLUT SDKs are installed: You need to find opengl.h, glu.h and glut.h, generally in /usr/X11R6/include, /usr/include, or /usr/local/include. |
| Video Library | Verify that your Video Library is installed: On Linux, V4L RunTime and SDK installed, or dv1394 and dv1394 RunTime and SDK installed. On SGI, ARToolKit has only been tested with SGI O2 models, but it should work with any SGI machine with similar video input hardware. |
| (Optional, for VRML renderer only) OpenVRML-0.14.3 | A source package of OpenVRML is included on the ARToolKit downloads page on sourceforge. |
Building ARToolKit
ARToolKit을 빌드할수 있다.콜솔 어플리케이션을 연다.
ARToolKit 을 압축해제한다.이후론 이 폴더를 {ARToolKit}로 지정한다:
tar zxvf ARToolKit-2.71.tgz
설정,빌드. 리눅스는 Video4Linux, IIDC-Compliant, IEEE-1394에 연결된 DV camera, USB에 연결된 소니 아이토이 카메라등을 이용한 비디오 입력에서 빌드를 지원한다.
cd {ARToolKit}

./Configure
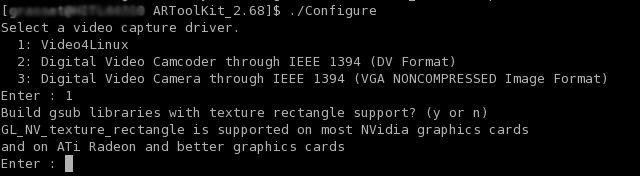
Linux Setup Screenshot
make
빌드가 성공하면, 아래의 바이너리를 실행시켜본다.
cd {ARToolKit}/bin

./simpleTest
The VRML renderering library and example (libARvrml & simpleVRML) are optional builds:
cd {ARToolKit}/lib/SRC/ARvrml

make

cd {ARToolKit}/examples/simpleVRML

make

cd {ARToolKit}/bin

./simpleVRML
Mac OS X
Prerequisites
| Prerequisite | Instructions |
| Apple Developer Tools | XCode Tools install CD is included with Mac OS X, or disk image available free from Apple, http://developer.apple.com/tools/xcode/ |
| Camera driver | Mac OS X 10.3 and later include an inbuilt IIDC and DV FireWire camera driver. USB camera drivers (and Firewire camera drivers for pre-10.3 systems) can be obtained from ioXperts athttp://www.ioxperts.com/ |
| (Optional, for VRML renderer only) Apple X11 and Fink | Install X11 off the Mac OS X install CD 3 or download an install disk image fromhttp://www.apple.com/downloads/macosx/apple/x11formacosx.html. Download Fink (and optionally, FinkCommander) fromhttp://fink.sourceforge.net/download/. |
Building ARToolKit
XCode IDE를 이용한 빌드:
- 압축을 푼다음, 프로젝트 파을을 연다.
- Builds include a script target "Configure" which enables accelerated and rectangular texturing by default. If you wish to change these defaults, manually run the ./Configure script from Terminal as for a command-line build (below).
- Executables are built as bundled applications into ARToolKit/bin, with the Data/ directory copied into the application bundle so that they may be moved from this location to other locations.
The VRML renderering library and example (libARvrml & simpleVRML) are optional builds:
- Using FinkCommander, do a binary install of mozilla-dev, followed by an install of openvrml4-dev and openvrml-gl5-dev.
- Select the ARToolKit extensions target, and build.
Alternately, ARToolKit can be built from the Terminal, using the Unix makefiles.
Drop the ARToolKit into a convenient location, e.g. your Desktop, then open a Terminal window and type:
cd ~/Desktop

tar zxvf ARToolKit-2.71.tgz
Configure and build
cd ~/ARToolKit

./Configure

make
Following a successful build, to run a binary such as simpleTest, add these commands:
cd bin

./simpleTest
The VRML renderering library and example (libARvrml & simpleVRML) are optional builds:
fink -b install mozilla-dev

fink install openvrml4-dev openvrml-gl5-dev

cd ~/Desktop/ARToolKit/lib/SRC/ARvrml

make

cd ~/Desktop/ARToolKit/examples/simpleVRML

make

cd ~/Desktop/ARToolKit/bin

./simpleVRML
Running the utilities and examples
Current versions of ARToolKit aren't designed to be installed in any standard location; thethe current compilation directory should be used to build your ARToolKit application. As ARToolKit builds only static libraries, these will be linked into any executable you build.

Graphics Test Screenshot
Video Test Screenshot